
I haven't had a chance to do anything super crafty in a while, but I really wanted to try out an idea I saw on the Better Homes and Gardens website.
Kevin and I don't really decorate for the holidays that much, because any extra money we have is spent on things that we need to fix up the house. Paint, wood, caulk, nails, tools, etc. Once the house is done (ha ha, yeah right!) we look forward to being able to spend more time decorating for the holidays.
But on a trip to the hardware store the other day, I just couldn't resist buying ONE white pumpkin. I knew it would be perfect for the project I had seen on BHG.com.

Before we headed home from the hardware store, we stopped by the new Hobby Lobby (a.k.a "The Lobster"). It just opened last week, so there was a big time Grand Opening sale going on. It was a mad house. I'm talking, pure pandemonium. Total "Tickle-Me-Elmo-hysteria-on-Black-Friday-1996" all over again. Except this time, is was all about the fake pumpkins, Halloween decorations and glitter.
Lucky for us, all we went in for was a pack of doilies and some stencil brushes...

Those aisles were like ghost towns. Obviously no one had seen the Better Homes tutorial that I had!
Before we checked out though, I did grab a pumpkin-on-a-stick near the check out lane...

It was 50% off $1.99. I didn't want the stick on it, so I just pulled it out. Easy breezy.

I also grabbed this twig one while I was there too. It had some leaves and a ribbon around the stem, but I wasn't crazy about them, so I cut them off. This one was 50% off of $7.99.

Back at home, I started by making sure all the little holes in the doily were completely open. I used a nail to poke out any extra paper that hadn't been fully punched out...


Next, just like the woman on the BHG.com tutorial, I cut out the center of the doily...


Then, I coated the back side of the doily with spray adhesive...

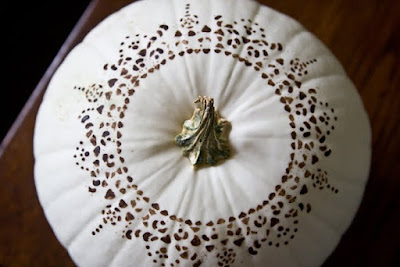
...and stuck it on the top of the pumpkin.

Using a stencil brush, I used some brown-colored craft paint to fill in the holes...


I went all the way around one time, and then when the first coat had completely dried, I applied a second coat...

When I was finished painting, I pulled off the stencil...

I wasn't 100% happy with the results, so I just used a small paint brush to go back in and add a little more detail...
I was really starting to get into it at this point, so I thought it might be neat to add a cursive letter "P" (for Palmer) to the front of the pumpkin. I printed one out (backwards) and "traced" it onto the pumpkin.


Since the pumpkin was somewhat soft, my pencil lines were very easy to see...

I filled in the "P" with more of the brown craft paint, and voila! Done!
I think it turned out pretty cute. I only wish I could afford to buy bunches of pumpkins so I could play around with all kinds of different designs! (Mental note: plant a pumpkin patch someday)

The three of them will probably end up on the linen press in the hallway.

But don't quote me on that...things are always changing at the last minute around here! :-)
Hope you enjoyed my little "tutorial inspired by another tutorial" and that you're having fun with your pumpkin(s) this year too!
Layla
Awesome Item Alert: Check out these galvanized place cards I purchased from Farmhouse Wares a few months back. I'm going to use them to label the appetizers at our "Halloweenie Roast"!
















87 comments:
That is just one elegant pumpkin!
m ^..^
Very cute! I like the brown and white combo, and your initial is the perfect touch. I may have to copy this idea ... that is if I decorate for fall this year! Thanks for sharing.
Love the pumpkin idea!!! I also saw an idea where the person spray painted artificial pumpkins/goards that had been bought on sale. They were monogrammed like you did yours and also painted beautiful bronze/pewter colors with spray paint. That way, they can be kept from year to year. I'll be looking for some pumpkins on sale after the holidays!! Thanks for sharing your ideas. Love & blessings from NC!
Halloween can be so "over the top;" it's nice to have a classy pumpkin tutorial to help me class up my house!
Nice job - love the white pumpkins!
ooh :) Lovely and looks like easy to make :) I dont know is it easy ?
Lovely pumpkin! I really must rememeber to grow white pumpkins next year in my garden.
Gotta love HL and 50% off fun stuff!
I can't believe I'm reading this post! I have a white pumpkin that I painted the other day as it was an art project we did with our boys. I wasn't sure what I was going to do with my painted white pumpkin and it's been sitting there awaiting my decision for days now. I'm a copycat b/c our last name starts with a P as well!
I have a black wooden letter on my dining room wall in the same font as your stenciled one! I'll see if I can eye it!
I love what you did to the white pumkin! so simpel yet so supercute!!!
Love that doily idea! I couldn't figure out what you did at first, I thought you bedazzled it LOL
I have a linky party going on, come by and link up! http://theshadesofpink.blogspot.com/2009/10/room-month-monster-dominoes.html
Hey now...bedazzling a pumpkin...
Hey Fabuloso Layla - where did you print the your letter from? I am always looking for beautiful letter stencils or tracers and haven't any I like. Thanks!
There is just something about a white pumpkin that gets me every time. Yours is lovely!! I saw a church that had a HUGE pumpkin selection yesterday (all the fun and funky pumpkins). I didn’t have time to stop but I will be going back this week! I can’t wait to get my craft on!
Happy Monday to ya :o)
Kendra @ Domestic Princess in training
Your pumpkin turned out gorgeous! Love it.
what a great idea. I love your simple but elegant arrangement. Hmm I could plant some pumkins next year, will make a note for that. Have a great week! Marla
Geez, and here I was thinking that the "P" might have been for "PJ". I'd been preparing my acceptance speech and everything!!!
Really pretty...and you DID make it look easy!
Morning Layla!
Love your pumpkin tutorial. The added feature of the stencil and the letter on a white pumpking is so pretty.
Those galvanized place cards are adoreable. I love unexpected things like that.
Very nice! I keep wanting to try something like that ... maybe today's the day!
This turned out lovely, Layla! Love that cursive "P" addition!!
So cute! I love all your stuff! The pumpkin turned out really great. And, I love the metal tags! That will be a great addition to your roast.
Great idea and I love how you spruced it up with your added details. Hobby Lobby is GREAT, but you'll enjoy so much more after the Elmo-like craze is done! LOL! ;)
It's very cute! Love the idea of using the doily!
That pumpkin is well dressed!
The P definitely makes it! Very nice little trio!
Kelly
http://tearinguphouses.blogspot.com
That pumpkin is just lovely!! Thanks for sharing!!
(and I have loved those galvanized tags for a long time now...maybe I should actually get me some.)
Oh, goodness, that is my kind of pumpkin!! Love it!
Suzanne
I didn't see that tutorial and I subscribe to the magazine! I guess I need to check out their website more often. It is one of the most elegant and simple pumpkin ideas I have seen. Thanks for brining it to our attention. One question - how do you print out initials backwards? Is there a special program you use or can it be done on Microsoft?
Thanks,
Pam
This is just precious!
Be a sweetie,
Shelia ;)
Oh, I truly love it! I clicked "like", wanting to say "L.O.V.E." I am going to copycat this idea today! Thanks so much for sharing it with us!
Layla,
Thanks for the idea. I must have missed it in the magazine. Love the colors.
Your pumpkin is adorable and the touch of lace makes the white pumpkin look romantic, instead of goolish. I prefer a pretty pumpkin too.
I love, love your sign above your reading room. I also have many signs around my home, I just finished one this weekend.
Keep creating and enjoy your day,
Elizabeth
love the pumpkin idea! I am going to buy out the carvable fake pumpkins at the craft stores when they clearance them out, paint them with metallic paint and have them for next year! Just an idea for saving money:)
Tamera@doubledelight
thank you so much for the pumpkin tutorial. I now know what I am doing this afternoon!
That turned out beautifully!!!
that is so beautiful. We had our pumpkin kicked down the road one year, but you have inspired me !
I love it Layla- can't wait to try it myself! Thanks for the endless inspiration.
Cute! I think saw this on Martha Stewart's website, one time. I might need to try it out.
FYI: I bought a few white pumpkins a couple of years ago (from Trader Joe's). They last about six months! When they were getting all gross we had a pumpkin smashing moment, and threw them all onto the driveway.
My husband swept the pieces into the dirt along side the driveway. About three months later there was a huge crop of pumpkins growing (although I didn't know it yet). We ended up with dozens of white pumpkins and I was able to give some as gifts. Totally worth the investment! White pumpkins are my all time favorite.
This year I grew scalloped white squash. I highly suggest growing your own!
That came out soo cute! I'd love to try that... not sure I have that steady of a hand for the detail though. Great job!!
OMG! This was the bestest tutorial! Of course, now I have to go home and do this! I have some green fake pumpkins left over from a last year's school project that I'm going to paint white, though. (Ya think that'll work?) I may even paint one or two of them black with white designs . . . mmmmm! Thanks for the fun inspiration!
Grins!
Pamm
Great Job! I don't decorate our house much for holidays, cause you are right, it is too expensive while you are trying to update the rest of your home.
Why can't money grown on trees? :)
Thanks for the update on all your adventures, you guys do great work!
Love the lacy pumpkin, and your punkin' family is sweet! pokey
It's turned out beautiful. I love it white pumpkins and monograms. Great job!
Roeshel
Layla, you rock! I bought two white pumpkins (actually LAST year) that are in desperate need of some style. Talk about coming through for me. I can't wait to try this out! Thanks again and God's blessings on your week, Sarah :D
Wow it came out gorgeous!!! I love the little grouping of them. I'm sure they look great in your home! Thanks for the tutorial of a tutorial!
Sarah
http://dreamindomestic.com
WOW... that is stunning!!!
I would think pumpkins would grow just fine in your neck of the woods. They are rather fun to grow too and don't take a lot of effort. If you a get a sweet pie version then you can actually steam them up and eat them ( or make pies) and get lots of vit A.
Your tutortial was lovely to see...your display simple and elegant.
Wow! Fabulous job, it looks amazing.
It looks like your pumpkin has a henna tattoo! Beautiful.
Adorable! I am off to buy a white pumpkin...
Chelsea
Love the pumpkin! What a great idea. Have a great week!
WOW I love that!
So cute! I don't really decorate for fall b/c the colors (orange, red, gold) don't really go with my decor. But I LOVE the white pumpkins!!
LOVE THAT PUMPKIN!! they are difficult to stencil on, though, aren't they?
That sure is a purty punkin!
Ok, that's it!!! I'm off to buy three pumpkins for my front yard!
I LOVE these pumpkins! White pumpkins have always been my favorite, and this makes me love them even more! I may have to try this myself this weekend!
k ... k ... you're killing me here! how cool is that?
i have a wagon full of various sized white pattypan squash that would really be charming with this idea ...
i did a very simple centerpiece for our thanksgiving dinner yesterday ... too simple actually ... i took the whitest pattypan and just tied this beautiful rich brown sheer ribbon on it's sage green stem ~ a full bow with the ends trailing to each side ... and set it on a festive fall napkin ... with so many dishes and bowls on the table, it's simplicity was soothing!
prairiegirl xo
That's one fine pumpkin you have there. I like it!
WOW that is fabulous! I never liked how Halloween was all orange and black - too goth for me. Thanks for the inspiration: I'm definitely going to try this! :)
Question!
Once you put the doiley on with spray-adhesive, doesn't that make it difficult to pull it off after the spray-ahesive and paint have dried?
143 it...
I have everything but a white pumpkin...this I am going to try...
Thanks Layla...
Kathy :)
I love pumpkins so much so that my kitchen was recently re done so that I can have pumpkins year round. I love your white pumpkin and lettering it brings so many ideas to mind! Thank you for sharing.
What a lovely pumpkin! How do you print things out backwards??
Absolutely beautiful! When you have such a pretty trio as that, that is all that you need for your fall decor.
congrats to the winners! Love that pumpkin!!!
How cool! I love your handy work!
Layla, Love the white pumpkin. Also, a note on the vine pumpkins, they've got them at my Target in the "cheap stuff" when you walk in the front door. I got 2 for $2.50 each. Check at your Target and see if they have any left.
I love this idea! I think I am going to use it this year!
That turned out great! Thanks for sharing,
Traci
Oh that is so pretty!
{{Hugs}}
Cathy
I love it! XO
Adorable Layla! So much so that I featured you on my Today's Hot Find for Tuesday. :)
http://funkyjunkinteriors.blogspot.com/
Donna
Your lettered pumpkin turned out lovely! The white with brown looks so elegant and fits into the Lettered Cottage perfectly.
I saw that idea with the doily and I've been dying to try it! I usually get some pumpkins off the vine that inevitably grows out of my mulch pile every year, but not a one this year! Guess I will have to cave and buy a couple so I can give this a shot.
That is definitely my mothers kind of pumpkin.
That is so pretty! I love the way it turned out and "P" is our last initial, too. Your last picture with them all together makes for a nice vignette.
Fabulous! You did a great job! I will try this today, thanks! ~liz
very beautiful...I'm a lover of white pumpkins too. I love the lacy doily idea...I may take your idea one step further with silver glitter...or black maybe...you have inspired me as always...
Very pretty. Immediately, I thought about henna tattoos. I've always thought those were gorg. Best wishes tomorrow for the Nest shoot!
This is such a great design, easy and elegant.
You hit the secret of elegance on the head...simplicity. Wow, what a beautiful vignette. Lovely work.
I'm loving your pumpkin, I'm a sucker for monograms. I actually just did a whole post on cute monogrammed stuff a couple weeks ago. I love that is looks so elegant and not themed like many homes are for halloween and thanksgiving. I just did a fall decor post on elegant decor items vs. themed ones. Check it out:
http://theclassywoman.blogspot.com/2009/10/fall-decor-inspiration.html
Love, love, love this idea. All the pumpkins look beautiful together. I love the juxtaposition of sizes and textures.
Lovely!
love it. i am off to create the pumpkin today. thank you.
I love this idea and your blog!! So stinkin' cute!! Thanks for sharing!
I LOVE your white pumpkin! Thank you for sharing!
Post a Comment