


And there ya have it! A guest bathroom update and some "Def Lep" to boot!
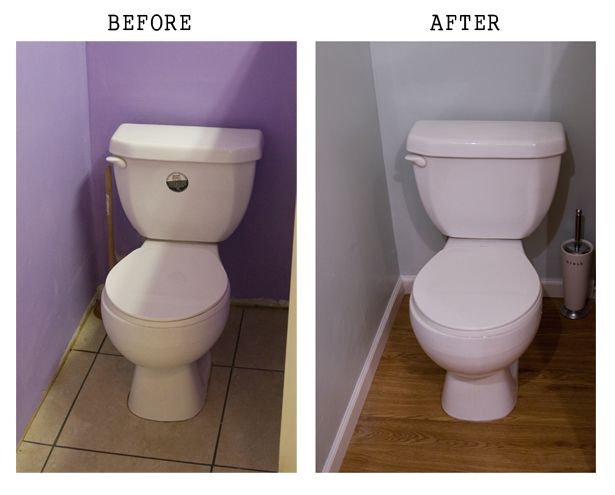
What's that? You want to see a presto chango? Sure thing! Just move your mouse back and forth over the photo below for a more interactive image of our twenty dollar transformation...

It's amazing what a little peel-n-stick flooring, a couple of new baseboards, some fresh new paint and removing the "American Standard" sticker off the front of your toilet after two years can do. :-)
(PS- the paint color we used is Sherwin Williams "Sea Salt")
Next up- cladding the ceiling in beadboard paneling.
I'm sure it's going to be quite challenging for us to attach two 4'x8' sheets of beadboard paneling to the ceiling in the somewhat cramped quarters. It'll probably involve some math too. Ugh. I hate math! Especially if the equation goes anything like this:
2 ginormous sheets of beadboard paneling + 2 DIYer's that don't own a nail gun = several stressful minutes as one of the DIYer's races around with the electric screwdriver and the other tries to hold up the weight of the aforementioned paneling using as much strength as he can muster.
But no matter what happens, I'm sure we'll figure out a way to get it up there, and it'll just be another crazy experience we can look back and laugh at someday. (Key word: someday)
:-)
Happy Thursday!
Layla
PS- Our kitchen was featured as one of HGTV's Top Ten Favorite Kitchens on a Budget yesterday:

Click on the photo for the full story!


64 comments:
It's been an exciting week for you guys!! Wish you lived a little closer...I'd bring our compressor and finish nailer over to make some speedy work of the ceiling.
Hope it goes well and good luck with the math (ugh).
Wow, guys, it almost looks like a different toilet! It's looking gorgeous so far, I really can't wait for the final reveal!!!! Amazing.
And congrats on your kitchen in HGTV!!!! How cool is that?
Congrats on the HGTV feature!
Your bathroom is looking gorgeous. Great job!
It's looking good! The floor looks like the real thing too!
Nice transformation!
I really like the "sea salt" colour!
/helena
I'm super curious about the peel & stick floor you used in the guest bathroom. What's the prep that needs to be done? Is it durable and completely water resistant? It seems like such an easy solution. Looks great!
Always so much fun to watch your videos! Feels like a little sitcom I'm watching...I especially laughed at you chomping on the instructions Layla!
Love the booty shake!
To help you with the ceiling I would definitely use an all purpose building adhesive on the back of the paneling, as well as the nails. Just be aware, that the nails may pop out with the wight of the paneling, a little so an extra 2 x 4 made into a "T" just barely short of ceiling height to help you hold up a side or even two should save you from being sore for three weeks! Good luck!
We have the exact same floor in our bathroom and LOVE it! It has been down for about a year and a half and is still perfect!!
Congrats on the HGTV feature! That is SO awesome!!
Lou Cinda
Wow. It's amazing what baseboard can do to an area! And the vinyl flooring looks great--can't even tell it's not real hardwood.
Bead-board paneling is really not that bad to intall. Use some liquid nails and your nail gun and you're set! You could always use bead-board wallpaper on the ceiling! Of course the steam from the shower/bath might peel the edges...Good luck!
y'all are too funny! love the choice in music too!! :D great job!
Love your blog!! You guys are so gifted and talented!! My husband is a diy'er, and to help me out with preventing a sore neck and body the next day, he built an "I" with 2x4's and places it under whatever material he's placing on our ceiling. The bottom piece of the "I" helps it brace on the floor for better support than just a "T". Does that make sense???
Love what you guys do!!
Blessings!
Kelly
Thanks for sparing us the wax ring part of the toilet instillation. When we did ours, I wanted to run and hide instead of clean the old one off and reinstall the new one. I love watching you guys DIY, I am trying to talk Sweet Daddy into doing the peel and stick wood in our basement.
Cha Cha
It is looking better and better with each update! Congrats on your kitchen being featured on the HGTV site! I am on my way over there now. Personally, I think they should offer you your own show!
- Deborah
Your bathroom is looking super. Love the new wall color. Congratulations on your kitchen being featured as one of the top 10 of all time. It really is just wonderful. Hugs, Marty
I love how it turned out. The video is too cute. Looks as if you both have a lot of fun while working together. Aww young love......
How are you liking the peel and stick floor so far? It looks really nice in the pictures! was it easy to install? Does it seem like it will hold up well?
The bathroom is looking so great!
Who knew a toilet could look so pretty?!
You guys are always so entertaining. Thanks for brightening up my dreary day. :)
You guys rock!
The bathroom is fabulous and I particularly love the floor. It's really inspiring!
This color is very similar to the one we picked for our bathroom. I can't wait to see how you decorate it! Thanks for sharing that hilarious video! You guys rock!
I love your blog! Do yourself a favor and run to your nearest Ace Hardware, and rent a ceiling prop thing(Not it's real name, but it's naptime and the brain is on hold for an hour or two.) Anyway, it's used to hold sheets of drywall up so you can screw them into the ceiling, and it'd work great for beadboard, I'm sure!
We just got new flooring in our bathroom recently. We painted the same color, Sea Salt. New white trim makes a huge difference. We even replaced the ugly yellow laminate countertops & rigged up vanity cabinet with a new black vanity with white marble top. New towel hooks, and some new towels sure finish the look. DIY projects are stressful but rewarding.
You make renovating look fun! The floors look great and i would never guess they were stick and peel! awesome job!
Poor Kev has all the battle scars of the reno. Take it easy there Kevin. Safety first.
I had to laugh out loud towards the end of the video because I actually thought maybe you all would of ended it with actually flushing the toilet so that we all could see that it worked.
My hubby has replaced a few wax seals on our toilets and they didn't always go well. Let's just say there was leakage. Hoping that you don't have any leakage.
I am thinking about using those peel and stick planks in our laundry room. They sure make a room look nice.
Thanks for sharing.
it's looking amazing! I love the B&W of you two at the beginning of the video..stunning! The Sea Salt is a beautiful color....very relaxing! I love the flooring & love that one of my design-idols used peel & stick flooring!!!! You guys never cease to amaze me! Congrats on the HGTV feature!
I am amazed at how good the vinyl flooring looks! Also, loved the music- the first song my husband and I danced to!
Looks SO good! Can't wait to see the ceiling too :)
Love it!!! The only thing missing from your video was the "flush" at the end! LOL You guys are great! I'm so excited that your kitchen made HGTV's list! woo hoo for you! :)
Hilarious video! It is fun to see your personalities after following your blog for quite a while. As usual, your blog is very inspirational. Congrats on the HGTV honor! You totally deserve it!
I see someone already mentioned it, but I might consider the beadboard wall paper for the ceiling. (I'm wanting to do this and am hoping you try it first! :)
Great Job.
You guys are awesome... and brave. No way would I tackle installing a toilet. I enjoy watching your how to videos and while most of them inspire me, some scare me to death.lol!
I look forward to visiting your blog every day to see what you're up to.
Go Layla and Kevin!
Beautiful as always! Congrats on it all! lulu
Layla, did you put the peel & stick on top of your floor tile or did you take it down to the wood?
The reno is amazing, I love the colors! You have had a great week! Have a wonderful evening!
Kristin
Your kitchen deserves honors, Layla. I love, love, love the transformation from simple to stunning. I'm putting the idea of adding super-sized crown above and brackets below in my back pocket. And of course painting them black and distressing them. Awesome. A cheap fix but with an amazing look.
Lovely my dear! My sister did the peel and stick flooring in her living room and master bedroom and it looks really nice.
Are you applying your beaded board paneling to existing gypsum board? If so, you can use a combination of construction adhesive and screws. If your ceiling will be stripped down to the framing, be sure to add lots of additional blocking so the paneling will be be well secured and not sag. Have fun!
hey, i have a suggestion that might actually help you! (rather than you helping me, for a change! btw, thanks for all the inspiration from your beautiful house!) When you hang the paneling on the ceiling, you could make a big T out of wood to help hold it up on one end. Like you do when you hang sheetrock. Do you know what I mean? We just hung some sheetrock on the ceiling and my dad had one of those T's and it really helped. Just a thought. :)
First of all CONGRATS on the HGTV feature! I love how the 3 simple changes of new flooring (can't believe it is vinyl!) and the paint color and baseboards made. It looks so much more sophisticated! :)
I have a $50 DECOR GIVEAWAY happening on my blog for you and your readers. Visit to enter:
http://theclassywoman.blogspot.com/
Oooh, very nice! That's a great transformation for $20!
Well I learned something new and just loved the video..you two are just the cutest!
xx
I did peel and stick wood in my bathroom, too.... It was actually nice and textured when I got out of the tub.
Supa sweet on the HGTV spot!
What kind of peel and stick flooring do you use? and how does it hold up in the Wetter areas? Is it the same as in your kitchen? =)
ha ha! ha ha! ha ha ha ha! I actually laughed out loud at your video, and rewound to watch max again. ha ha! oh, that's great! I'm still smiling!
(and my husband is kicking me since I have the laptop in bed again.)
and, yes -- thank you for not showing anymore of the wax ring -- we've done three or four toilets, and all I can say is ew, ew, ew!
love to you both, and congrats on all the press you little super stars!
megan
that's amazing! Congrats!
Oh my gosh... you guys are too funny... and so cute... loved the video. :)
Your bathroom is lookin' soooo good :). I am very glad you recommended the peel 'n stick vinyl planks for my bathroom, too. They WERE inexpensive and they DO look and feel like real wood--I couldn't be more pleased!
Laughed so much while watching the toilet video and that little rascal Maximus trying to steal the show! You guys are so fun!
Blessings,
Sindy
That was THE most enjoyable video I have ever seen of a toilet being installed. :) I laughed out loud a couple of times. Great job!
Just came across this blog and am so impressed with the content! I especially love the kitchen, it's just great!
Just came across this blog and am so impressed with the content! I especially love the kitchen, it's just great!
Just came across this blog and am so impressed with the content! I especially love the kitchen, it's just great!
Congratulations to you guys! :) I'll admit that your kitchen is one of (ok, it's really hard to choose!) my favorite rooms in your home. And picturing you putting up that beadboard ceiling really made me laugh! What a picture! :) I'm sure it'll turn out beautifully, as all of your projects do!
Blessings,
Stacey
OOO! I live so close to that fateful corner where the drummer in Def Leppard lost his arm. Just a bit of useless information!
ZoeB
Your bathroom is looking awesome! Good luck on the beadboard ceiling. We put it on our laundry room ceiling last year, and I think my husband said a few not so nice words, and he does have a finish nailer! But it is SO worth it when you're done! Can't wait to see the finished project!
Beth.
I've been following your great renovations since you did the kitchen. Love your style! I had to comment and suggest that you use a "dead man" for the ceiling. It is simply a 2x4 with another 2x4 attached in a "T". it should be as tall as your ceiling and then you just slide it up under the wood that you want to hold up. It makes it so much easier! Hope this helps you:>)
I'm not much help at the actual job...but when you put up your ceiling and you put the sheet up...take a 2x4 longer than your ceiling height...set up against bottom of your board and push just tight enough do do the holding on that side...then person holding up weight only is holding a little. Can do this in a few spaces and save your little muscle fibers!
Layla i was thinking could'nt you use the beadboard wallpaper on the ceiling to get the same effect as the wood?? I would think that would be easier to cut and install...and no painting!
It looks awesome and I love the music choice!
Laughed so hard when you nailed Kevin in the eye! Hope he recovered quickly :) The bathroom is coming along beautifully, I am so impressed by how much money you are saving- you would never know to see it!
Can I be a bum for a second though? If your toilet should ever happen to get a leak, the plummers putty will prevent the water from coming out and force it into your floor. Before you would realize there was damage or even a leak it would be a big insurance fiasco. My toilet was sealed around the bottom (leaked for years and we never even knew!) and eventually sprung a leak into my kitchen :( It was a HUGE mess to say the least but if it had not been sealed, the water would have run out from underneath, caught our attention and been taken care of ASAP. Good luck with the rest of the bathroom, I can't wait to see your final reveal!
Hi Kevin and Layla. You all did a wonderful job installing that toilet. It really looks great. With the new floor, paint and molding, it doesn't look like the same room. Congratulations on your kitchen being featured on HGTV in the top 10. Way to go!
Great video! These are so fun to watch. . .are they as much fun to edit???
Looks great- try having some 2 x 4's the height of your ceiling handy to prop up the ceiling pieces- And you screw it and let him hold it. Or you could liquid nail it up in a few places to hold it and then screw.
Loved the video!
Post a Comment